Battery switch on travel trailer function is crucial for managing your RV’s power. This guide breaks down everything you need to know about these switches, from understanding their different types and how they work to troubleshooting problems and performing essential maintenance. We’ll cover connecting and disconnecting batteries safely, selecting the right switch for your needs, and even delve into the inner workings of these vital components.
Whether you’re a seasoned RVer or a newbie just getting started, understanding your battery switch is key to enjoying trouble-free adventures. We’ll cover everything from basic operation to advanced troubleshooting, ensuring you’re equipped to handle any situation. Get ready to become a battery switch expert!
Understanding Battery Switches in Travel Trailers
Properly managing your travel trailer’s power is crucial for a successful trip. A key component in this system is the battery switch, which controls the flow of power to and from your batteries. Understanding how these switches work is essential for preventing electrical problems and ensuring you always have power when you need it.
Types of Battery Switches
Travel trailers utilize several types of battery switches, each designed for different needs and levels of complexity. The most common types include simple on/off switches, dual battery switches, and more sophisticated systems incorporating remote control or digital monitoring capabilities.
Purpose of Battery Switches, Battery switch on travel trailer function
The primary purpose of a battery switch is to isolate your trailer batteries from the rest of the electrical system. This is important for several reasons. First, it prevents unwanted battery drain when your trailer is not in use. Second, it allows you to disconnect your batteries for maintenance or to prevent accidental short circuits. Third, it enables you to choose which battery bank (if you have multiple) powers your trailer’s systems.
Finally, some switches also protect against reverse polarity issues, preventing damage to your electrical components.
Operating a Battery Switch
Operating a battery switch is generally straightforward, but the exact procedure depends on the switch’s design. However, most switches follow a similar pattern:
- Locate the switch: This is typically found near your battery bank, inside a compartment accessible from the outside of your trailer.
- Identify the switch positions: Common positions include “Off,” “Battery 1,” “Battery 2,” and “Both.” Some switches may have additional positions like “Start” for dedicated starting batteries.
- Select the desired position: Turn the switch to the appropriate position to connect the desired battery or batteries to the trailer’s electrical system.
- Verify functionality: After changing the switch position, check that your trailer’s electrical systems are functioning as expected.
Always refer to your trailer’s owner’s manual for specific instructions on operating your particular battery switch. Improper operation could lead to electrical problems or damage to your equipment.
Comparison of Battery Switch Features
The following table compares the features and benefits of various battery switch types. Choosing the right switch depends on your trailer’s setup and your power needs.
So, you’re an audiophile who travels? Awesome! First, check out this guide for setting up your audio on the go: audiophile travel aetup. It’s packed with tips on portable DACs and headphones. Then, if you’re planning a mountain getaway, consider the specialized advice offered in this other resource on audiophile travel aetup for maintaining sound quality in higher altitudes.
Remember, good sound doesn’t have to stay at home!
| Switch Type | Features | Benefits | Drawbacks |
|---|---|---|---|
| Simple On/Off | Single switch, on or off | Simple, inexpensive | Limited control, potential for full battery drain |
| Dual Battery Switch | Selects between two batteries or combines them | Allows for separate battery use (e.g., starting vs. house battery) | More complex than simple on/off |
| Remote Battery Switch | Controlled from a remote location (often inside the trailer) | Convenient access, no need to reach the battery compartment | More expensive, potential for remote failure |
| Digital Battery Switch | Provides monitoring of battery voltage and state of charge | Enhanced monitoring, improved battery management | Most expensive, requires more technical understanding |
Connecting and Disconnecting Batteries
Connecting and disconnecting your travel trailer batteries to the battery switch is a straightforward process, but safety is paramount. Proper procedures will ensure the longevity of your batteries and prevent potential hazards. This section details the steps involved, best practices for maintenance, and crucial safety measures.
The process of connecting and disconnecting your batteries depends on the type of battery switch you have. Most commonly, you’ll find a battery switch with multiple positions: “Both,” “Battery 1,” “Battery 2,” and “Off.” Regardless of the switch type, the fundamental principle remains consistent: ensure the switch is in the “Off” position before making any connections or disconnections.
Battery Connection Procedure
Before beginning, always wear appropriate safety gear, including eye protection. Locate your battery terminals – positive (+) and negative (-). They’re usually clearly marked. Clean any corrosion from the terminals using a wire brush or terminal cleaner. This improves conductivity and prevents poor connections.
Then, carefully connect the positive cable to the positive terminal of your battery, followed by the negative cable to the negative terminal. Ensure the connections are tight and secure.
Battery Disconnection Procedure
To disconnect your batteries, reverse the process. First, ensure the battery switch is in the “Off” position. Then, carefully disconnect the negative cable from the negative terminal, followed by the positive cable from the positive terminal. Once disconnected, store the cables safely to prevent accidental contact or damage.
Maintaining Battery Connections
Regular maintenance of your battery connections is crucial for optimal performance and longevity. Inspect your connections regularly for corrosion or looseness. Clean any corrosion immediately using a wire brush and baking soda solution. Tighten any loose connections. Applying a thin layer of dielectric grease to the terminals after cleaning helps prevent future corrosion.
So, you’re an audiophile who travels? Awesome! Check out this guide for setting up your audiophile travel setup on your next adventure, whether it’s a relaxing seaside getaway at audiophile travel aetup , or a more rugged mountain retreat. For those hitting the slopes, or simply enjoying the mountain air, consider these tips for a killer audiophile travel aetup experience.
Remember, packing light doesn’t mean sacrificing sound quality!
Safety Precautions When Working with Batteries
Working with batteries requires caution. Batteries produce hydrogen gas, which is highly flammable. Avoid sparks or open flames near batteries. Always wear safety glasses to protect your eyes from potential acid splashes. If acid does splash on your skin or clothing, immediately flush the affected area with plenty of water and seek medical attention if necessary.
Never touch both battery terminals simultaneously; this can cause a short circuit and potential injury. Remember to disconnect the negative terminal first and reconnect it last to prevent accidental short circuits.
Safe Battery Connection and Disconnection Flowchart
The following flowchart visually represents the safe procedure for connecting and disconnecting your travel trailer batteries:
[Flowchart Description] The flowchart would begin with a “Start” box. The next box would be “Turn Battery Switch to ‘Off'”. Then, a decision box: “Connecting or Disconnecting?”. If connecting, the next step would be “Clean Battery Terminals”. Followed by “Connect Positive Cable (+)”, then “Connect Negative Cable (-)”, and finally “Turn Battery Switch to Desired Position”.
If disconnecting in the decision box, the steps would be “Turn Battery Switch to ‘Off'”, “Disconnect Negative Cable (-)”, “Disconnect Positive Cable (+)”, and finally “End”. Each step would connect to the next in a clear, linear progression. The flowchart would utilize standard flowchart symbols (rectangles for processes, diamonds for decisions, and ovals for start/end).
Battery Switch Maintenance and Upkeep: Battery Switch On Travel Trailer Function

Keeping your travel trailer’s battery switch in top condition is crucial for reliable power and the longevity of your batteries. Regular maintenance prevents problems down the road and ensures you always have power when you need it. Neglecting this simple task can lead to corrosion, poor connections, and ultimately, battery failure.Proper maintenance of your battery switch involves a combination of regular inspections, cleaning, and preventative measures.
This will not only extend the lifespan of your switch but also help protect your investment in your batteries. A well-maintained switch ensures a safe and efficient transfer of power, preventing potential hazards and ensuring your appliances function as expected.
Regular Maintenance Schedule
A simple schedule can greatly extend the life of your battery switch. Aim for a monthly inspection during the camping season and a thorough cleaning and inspection at the beginning and end of each camping season. This schedule is a guideline; more frequent checks might be necessary in harsh environments (high humidity, salty air). Consider the conditions your trailer experiences to tailor your maintenance schedule.
For example, if your trailer is stored outdoors year-round in a humid climate, more frequent inspections are advisable.
Tips for Extending Battery Switch Lifespan
Several practices contribute to a longer-lasting battery switch. Using dielectric grease on all connections helps prevent corrosion. This grease acts as a barrier against moisture and other contaminants that can cause oxidation and impede the flow of electricity. Additionally, ensure the switch is properly tightened – not too tight to avoid damage, but firmly secured to ensure a solid connection.
Regularly inspecting the switch for any signs of damage, such as cracks or loose wiring, will help prevent more significant issues later. Addressing minor issues promptly is key to avoiding larger problems.
Cleaning Battery Terminals and Connections
Clean battery terminals are essential for efficient power transfer. Corrosion buildup on the terminals restricts current flow, leading to reduced battery performance and potentially damaging the battery switch. To clean the terminals, use a wire brush or terminal cleaner to remove any corrosion. A baking soda and water paste can also be effective. After cleaning, apply a thin layer of dielectric grease to protect the terminals from future corrosion.
Remember to always disconnect the negative terminal first when working with batteries.
Battery Switch Inspection and Maintenance Checklist
Before starting any work, always disconnect the negative battery terminal first. Safety is paramount.
- Visual Inspection: Check for any signs of damage, corrosion, loose connections, or overheating on the switch itself and the battery terminals.
- Tightness Check: Ensure all connections, including those on the battery terminals and the switch, are securely tightened.
- Terminal Cleaning: Clean battery terminals and connections using a wire brush or terminal cleaner and apply dielectric grease.
- Switch Operation: Test the switch’s functionality by switching between battery banks and observing the voltage readings.
- Grease Application: Apply a thin layer of dielectric grease to all connections to prevent corrosion.
- Wiring Inspection: Inspect all wiring connected to the switch for any damage or fraying.
Impact of Battery Switch on Travel Trailer Systems
Your travel trailer’s battery switch is the central control for your DC power. Understanding its impact on different systems is crucial for safe and efficient operation. A simple flip of the switch can mean the difference between a fully functional RV and a dark, cold, and inconvenient stay.
The battery switch dictates which power source feeds your trailer’s 12-volt systems. In the “off” position, all 12-volt systems are disconnected from both the house battery and the vehicle’s charging system. Switching to “house” connects only the house battery to the trailer’s 12-volt circuits, while “both” connects both the house battery and the vehicle’s charging system, allowing for charging while driving.
“Vehicle” usually refers to a direct connection from the tow vehicle’s battery, typically for starting and limited functionality, and this configuration is usually only appropriate for short periods.
Effects on Trailer Systems
The battery switch directly controls the power supply to various 12-volt appliances and lighting within your travel trailer. With the switch in the “off” position, everything from interior lights and water pumps to the refrigerator (if it runs on 12V) will be completely deactivated. In the “house” position, only the house battery powers these systems, while “both” allows both the house battery and charging from the tow vehicle to power them.
A properly functioning battery switch ensures consistent power delivery to these systems, preventing malfunctions and ensuring a comfortable living environment. Improper usage, however, can lead to a variety of issues.
Consequences of Improper Usage
Improper use of the battery switch can result in several problems. Leaving the switch in the “both” position when not connected to the tow vehicle can lead to premature depletion of the house battery, potentially leaving you without power when you need it most. Conversely, leaving the switch in the “off” position while connected to the tow vehicle will prevent the house battery from charging.
Switching between positions while systems are running can cause voltage spikes, potentially damaging sensitive electronics. For example, suddenly switching to “off” while the water pump is running could damage the pump’s motor.
Power Draw Comparison
Different systems in your travel trailer draw varying amounts of power. For instance, a small LED light draws significantly less power than a large air conditioner (even if the air conditioner runs on 120V, the 12V system is still involved for the control system). A water pump requires a higher current than a simple interior light. The total power draw of all running systems determines the rate at which your battery discharges.
Knowing which systems draw the most power allows for more efficient energy management. For example, consider turning off lights and other high-draw systems when not in use to conserve battery power.
Faulty Battery Switch and Electrical Problems
A faulty battery switch can manifest in several ways. It might fail to make a proper connection, resulting in intermittent power or no power at all to certain systems. It could also cause a short circuit, leading to blown fuses, damaged wiring, or even a fire. Symptoms of a faulty switch include flickering lights, appliances not working consistently, or a constantly draining battery even when the trailer isn’t in use.
Regular inspection and maintenance of the battery switch are essential to prevent such issues.
Selecting the Right Battery Switch for Your Travel Trailer
Choosing the correct battery switch is crucial for safely and efficiently managing your travel trailer’s power. The wrong switch can lead to insufficient power, overheating, or even damage to your batteries and electrical system. This section will guide you through selecting a switch that meets your specific needs.
Battery Switch Amperage Ratings and Battery Support
The amperage rating of your battery switch is paramount. This rating indicates the maximum current the switch can handle without overheating or failing. Underestimating this requirement can lead to a dangerous situation. Your switch’s amperage rating should significantly exceed the combined amperage draw of all your appliances and charging systems. For example, if your combined draw is 100 amps, a 200-amp switch would provide a comfortable safety margin.
Additionally, consider the number of batteries your setup requires. Some switches are designed for two batteries (allowing you to isolate house and starting batteries), while others support more complex configurations. Ensure the switch can accommodate the number of batteries in your system.
Factors to Consider When Purchasing a Battery Switch
Beyond amperage and battery capacity, several other factors influence your choice. Brand reputation is important; reputable brands often offer better quality, durability, and warranties. While price is a factor, prioritizing quality and safety is more important in the long run. A higher-priced switch with robust features might save you money and headaches in the future by preventing costly repairs.
Consider features such as built-in circuit breakers for added protection and ease of use. A clearly labeled switch with easy-to-understand markings will make managing your power simpler and safer. Finally, consider the switch’s physical size and mounting style to ensure compatibility with your travel trailer’s electrical system.
Comparison of Battery Switch Models
The market offers various battery switches with different features and price points. The following table summarizes some key features of commonly available models (Note: Specific models and prices vary by retailer and may change over time. This table provides a general comparison and should not be considered exhaustive.):
| Model (Example) | Amperage Rating | Number of Batteries Supported | Key Features |
|---|---|---|---|
| Switch A | 150 Amps | 2 | Circuit Breaker, LED Indicators |
| Switch B | 200 Amps | 3 | Remote Switch, Heavy-Duty Construction |
| Switch C | 100 Amps | 2 | Basic Design, Affordable Price |
| Switch D | 250 Amps | 4 | High-Capacity, Multiple Outputs |
Visual Representation of Battery Switch Components
Understanding the physical makeup of a battery switch is crucial for proper installation, maintenance, and troubleshooting. This section provides a detailed description of a typical battery switch, allowing for a clear visual understanding even without a diagram.A typical battery switch, designed for a travel trailer’s 12-volt system, is a relatively compact device, often rectangular or square-shaped, usually made of durable plastic or metal housing for protection.
Its size varies depending on the number of batteries and amperage it’s designed to handle. The switch itself acts as a central control point, allowing you to isolate or connect different battery banks to the trailer’s electrical system.
Internal Workings of a Battery Switch
Inside the housing, the core components are several heavy-duty switches, typically toggles or rotary switches, each controlling a specific battery connection. These switches are wired to robust terminals, designed to handle the high current draw of the batteries. The internal wiring is usually thick gauge copper, capable of safely conducting significant amperage. The switches are mechanically linked to prevent accidental short circuits, ensuring that only one battery bank is connected to the load at a time.
A protective cover, often transparent, may be included to prevent accidental contact with live wires.
Types of Connectors and Terminals
Several types of connectors and terminals are used in battery switches, depending on the switch’s design and amperage rating. Common types include ring terminals, which are crimped onto the battery cables, and stud terminals, which accept threaded bolts. Some switches utilize quick-disconnect connectors for easier battery changes. The size and material of these connectors and terminals are critical; they must be rated to handle the current flowing through them to prevent overheating and potential fire hazards.
Larger switches, handling more amperage, will typically use larger gauge wires and more substantial terminals.
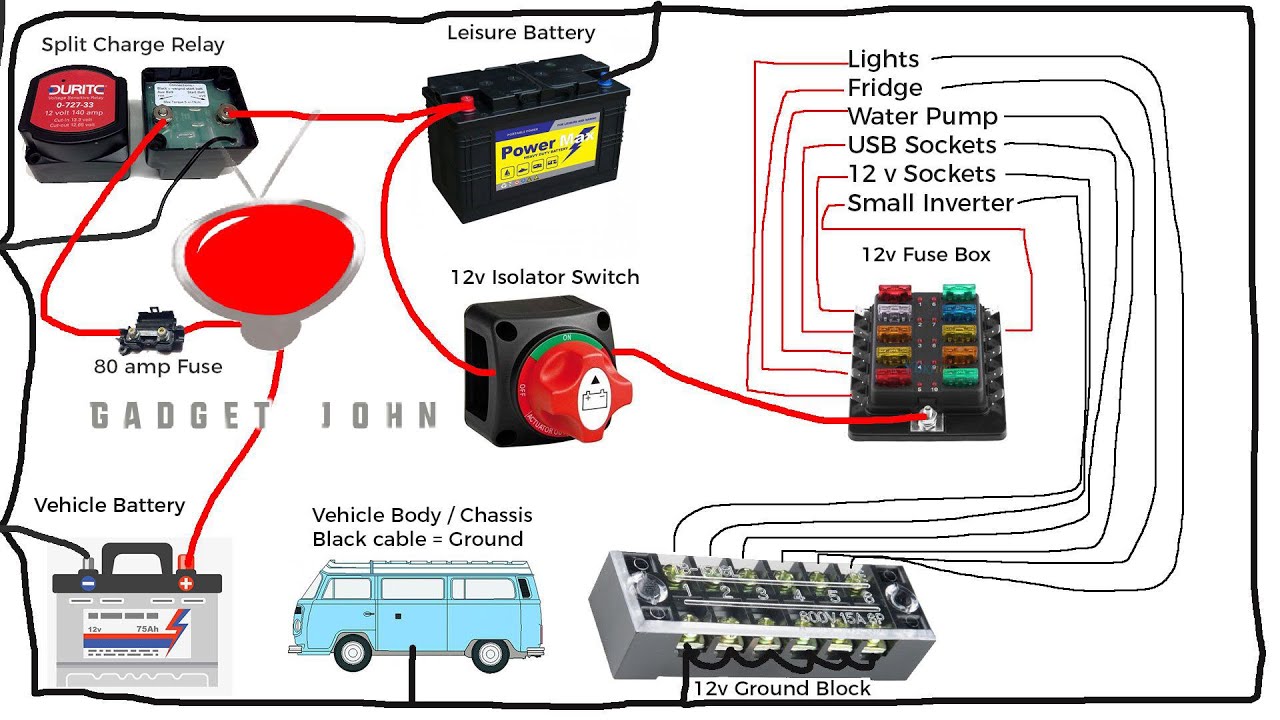
Detailed Description of a Battery Switch Illustration
Imagine a rectangular box, roughly 6 inches wide, 4 inches high, and 2 inches deep. The top of the box has several clearly labeled switches. For a typical two-battery setup, there would be two switches: one labeled “Battery 1” and another labeled “Battery 2.” A third switch might be labeled “Both” or “Combined,” allowing you to connect both batteries in parallel.
Each switch has a clearly visible indicator (ON/OFF or similar) showing its current status. On the side of the box, you see several heavy-duty terminals, typically two sets of terminals for each battery and an additional set for the load (the trailer’s electrical system). Thick gauge wires are securely connected to these terminals using ring terminals or other suitable connectors.
The terminals are clearly labeled to correspond with the switches on the top. The entire box is made of robust, impact-resistant plastic. The internal wiring is neatly organized and protected within the housing. The overall design emphasizes safety and ease of use.
Mastering your travel trailer’s battery switch is a game-changer for your RVing experience. By understanding its function, performing regular maintenance, and knowing how to troubleshoot common issues, you’ll ensure reliable power for all your onboard systems. Remember, safety is paramount when working with batteries, so always prioritize proper procedures. Happy travels!
FAQ Guide
What happens if my battery switch is faulty?
A faulty switch can lead to power loss, inconsistent operation of appliances, and even damage to your batteries or other electrical components. It might not fully disconnect batteries, leading to battery drain, or fail to connect them, leaving you without power.
How often should I inspect my battery switch?
Ideally, inspect your battery switch at least once a month, and more frequently if you use your trailer regularly. Look for corrosion, loose connections, and any signs of damage.
Can I use a multimeter to test my battery switch?
Yes, a multimeter can help determine if the switch is correctly routing power. You can test voltage at various points in the circuit to pinpoint any issues. There are online tutorials that show you how to do this safely.
What type of battery switch is best for my travel trailer?
The best type depends on your trailer’s power needs and the number of batteries you have. Consider the amperage rating and whether you need features like a disconnect for solar panels or other accessories.
